Friday, October 21, 2011

Vintage Halloween


I'm not sure where I found this picture, but I knew I would want to make something with it. I cut the picture down a little and matted it on Pacific Point blue and then on Dusty Darango (all of the pieces were distressed. The card base was embossed with the Square Lattice embossing folder from Stampin' Up. I added a little orange glitter glue (Stickles) on the pumpkin. I have another vintage halloween card to show next time! Thanks for looking!

Thursday, October 20, 2011

Totally Tools


Here are a couple birthday cards I made using the set "Totally Tools" (Stampin' Up). I had a friend ask for some masculine birthday cards and thought this set would work. I colored the stamped tools with Copic markers, cut them out and attached them to the printed background paper. I found the brads shaped like "nails and screws" at Hobby Lobby. I thought they would look good on a card like this.

Wednesday, October 19, 2011

Greeting Card Kids

Here are a few samples I made with the set "Greeting Card Kids" (Stampin' Up). For the Halloween card, the image is colored in with Copic markers. I distressed the image a bit to make it look more vintage and also sprayed it with glimmermist to add some sparkle. The ribbon is wrinkled seam binding. The back to school card image is also colored with Copic markers. The alphabet background was created with the stamp "A to Z" (Stampin' Up). I also used the wrinkled seam binding ribbon on this card. The Christmas card image is colored with Stampin' Up markers. All materials on this card are Stampin' Up. Just wanted to show you what a cute set this was. I haven't used the Valentine image yet, but soon! Thanks for looking!

Saturday, October 8, 2011

Pencil Card

I got this pattern idea from a friend. She sent me a card similar to this last year for back to school time. I dug out her pattern and came up with this. I used the swiss dot embossing folder for the background. I used Stampin' Up red polka dot ribbon for the eraser part. The "thank you" stamp and the scallop circle punch are also Stampin' Up. I used an apple brad for the embellishment to finish off this card. Thanks, Kristi for the cute idea!

Tuesday, October 4, 2011

Apple Treat


This is a little birthday treat I made for one of my teacher friends. She teaches first grade and I thought this would be cute sitting on her desk this morning. I used the "kids" stamp from a retired Stampin' Up set, "Heart and Home". The cute apple paper is from Craft n Craftin' (Back 2 School set). The ribbon is from Hobby Lobby. Some chocolate (wrapped in matching print paper) in an apple tin finishes off the gift. Thanks for stopping by!

Sunday, September 25, 2011

An Apple for the Teacher

I made these cards for back to school time. The punch I used is from Martha Stewart. It was quick and easy to punch some fun apples from different prints of pattern paper. The sentiment is from PaperTrey Ink. The lined paper is actually old school paper I found when our school closed a few years ago. Now that school has begun and we are getting settled in, I hope I will have more time to post my creations! Thanks for stopping by!!

Tuesday, September 6, 2011

Teacher Tag Album

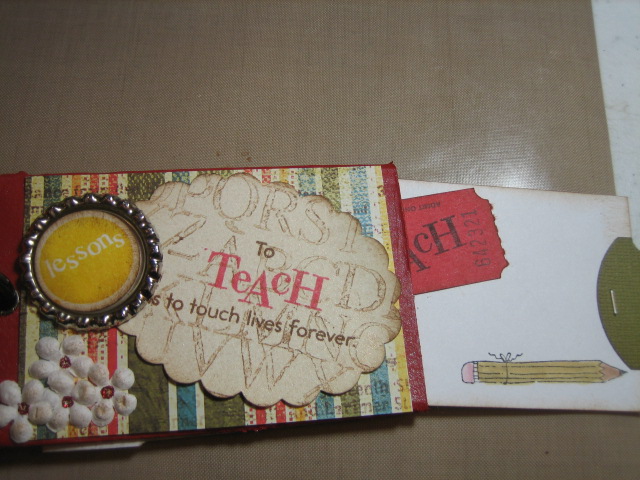
Today was the first day of school and I thought this would be a good post to celebrate teachers. I made this album a few weeks ago. Actually, I painted the "toilet paper rolls" a while ago with the idea of making it into a teacher or school album - it just took me a few months to get around to putting it together. This album was made just like the one I posted last December (Things I Love Album). The pages are made from toilet paper rolls that have been flattened and painted. They are then bound at one end, making the other end an open pocket, perfect for pull-out tags. The cover is made using an old school pin I had. I removed the pin from the back making it flatter and easier to glue it on the front. The other pages were made with odds and ends I had laying around. The last picture shows how I packaged it up for sale. The first book I made took a lot of wear and tear at the store. Packaged up this way with a description on the back will protect it better. Thanks for looking!

Create from a Kit

  I'm always on the look out for these kind of cards.  They are so easy to create from.  By using a few tools and supplies from your sta...