Saturday, April 19, 2008

Invitations

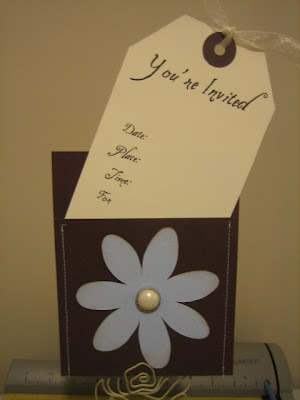
These are a few samples I made up for a friend for a shower invitation. The light brown card is Stampin' Up Close to Cocoa color and the dark brown is Chocolate Chip color. The flowers are made with Stampin' Up Bashful Blue. The flowers were cut with the Cricut (George and Basic flower). The dark brown invitation up above has a pearl embellishment for the center of the flower and a lighter cream inviation tag (the pearl center can be added to any of the flowers). The other invitation tags are made with a more champagne color.

Thursday, April 17, 2008

"arte y pico" Award

This award has been passed on to me by Sarah Ann from PaperCrafting by SimpleCrafter. Thank you very much, I am honored. I now have to award this to five other people, they in turn (I hope anyway) will do the following... 1) You have to pick 5 blogs who deserve this award for their creativity, design, interesting material and also contributes to the blogging community no matter what language 2) Each award has to have the name of the author and also a link to the blog to be visited by everyone. 3) Each award winner has to show the award and put the name and the link to the blog that has given her or him the award . 4) Award winner and the one who has given the prize have to show the link of "arte y pico" blog, so everyone will know the origin of the award. (Cut and paste the info into your blog to make things easier). I have chosen Lori from StampScents *** Handmade by Kelly Bee *** Just Stamp It *** Simply Pink *** Paper Dreams *** Check out these cute sites!

Wednesday, April 16, 2008

Snappy Birthday!

I bought this set a while back and haven't done much with it, but as the weather gets a little nicer, I start looking at some of my more summery stamping sets. This set is Crab and Company from Stampin' Up. I love the googlie eyes, the three dimensional look just adds so much. I made little slits in his claws so he can hold the cake and hat. I used the big wheel Spunky Spots (also from Stampin' Up) for the background on the card. On the inside of the card, I used the sentiment "a pinch to grow an inch". I thought this would make a cute kids card. TFL!

Sunday, April 13, 2008

B is for Baby

or.... maybe B is for Back! I can't believe I haven't been here for almost two months! Where does the time go??? I'm not sure why I haven't posted for so long (probably fighting teenagers for computer time might have something to do with it!) But, I have been keeping busy paper crafting (I just haven't been taking pictures!) I did grab a few cards and snap a few picts to show what I have been working on. Here are a few baby cards I have been working on. The bear cut out is actually a Stampin' Up stencil from way back. The face is stamped with the set Fun Faces (also from way back!) The small bear is from the set Bundle of Joy and the background is an Cuddlebug embossing folder embossed on white. I like the clean white look for this baby card. And the B is for Baby card uses the set Just B from Stampin' Up. The flowers are from a set from my friend that came with felt and prima flowers together. This is the first time I have used felt, they are very cute! In the center of the flowers is a little button brad. I have more baby cards to show next time, so until then, hope everything is well out there in blogging land. Thanks for looking!

Sunday, February 17, 2008

How Sweet It Is

This set of stamps is from Gina K. Stamps with a Cause called How Sweet It Is. This set is very near and dear to my heart because proceeds from this set go to the Diabetes Foundation and my oldest daughter, Tori was diagnosed with Juvenile Diabetes six years ago when she was eleven years old. What a great idea for a stamp company to not only design stamps for us (the addicted ones!), but to help contribute to so many causes. Diabetes is not her only chosen cause, she also supports Autism and the Make a Wish Foundation and I wouldn't be surprised if she has other designs and charities coming up. The stamps come two different ways, wooden block mounted (that you mount yourself just like Stampin' Up) or just the red rubber mounted on cling that you can use with acrylic blocks. These stamps are very well made. Check out her website to find out more about these stamps and to see card samples Stamps For a Cause http://stampsforacause.ginakdesigns.com/ This site also provides information about diseases and the charities. Check back here as well for more samples. I think all of these sets would be worth having.

Wednesday, February 13, 2008

Valentine Treats

Here are the Valentine treats I made for my first graders. I couldn't find craft match boxes so I used match boxes from the grocery store. I emptied the matches (obviously!), and painted the push through drawer part. The outside I decorated with patterned paper. I added a dimensional heart with the student's name on it. Inside, I put a miniature Hershey candy bar. I am going to put these on their desks tomorrow morning for a little treasure box surprise! Of course, I got them some other things like pencils, erasers, etc. Hope they like their little treats! Happy heart day!

Sunday, February 3, 2008

Wedding Binder

Well, this was new to me. I have never made a wedding planner binder before. As a matter of fact, when I went online to get some ideas on how to put this together, I couldn't find anything except books that have been written for wedding planning. I was thinking more along the lines of a book that the bride could keep pictures, cut-outs, receipts, business cards, etc all in one place. Just some form of general organization. I used a white notebook binder with a front and back insert. The color theme is black and white with purple as an accent. I came up with several categories and tabbed them throughout the binder such as budget, guest list, check list, flowers, ect. The categories include lined pages so the bride can shop around and get prices and keep track of this information. I also included photo sleeves under the dresses and cake categories in case the bride had photos or magazine clippings she wanted to keep track of. This way, if she is browsing through bridal magazines, she can cut out pictures and keep them all in one place. I created clear pockets by using acetate sheets and sewing them onto cardstock. This way the bride can slide in invitation samples or program samples and they are visible. I also included several pocket pages with decorative paper clips for business cards or just for extra storage. A few black and white photos, metal charms and ribbon added some more personal touches.

Create from a Kit

  I'm always on the look out for these kind of cards.  They are so easy to create from.  By using a few tools and supplies from your sta...